Configuring Bitbucket Pipelines to connect to AWS with OpenID Connect
BitbucketPipelines provide an easy and integrated way to run CI/CD Pipelines for your projects hosted in the Bitbucket code repositories using a straightforward YAML DSL to CI/CD your applications and other cloud resources to production, however using static AWS IAM keys as secured variables at the individual code repository level or as Bitbucket workspace variables with AWS STS permissions to jump into other AWS accounts can become challenging when operating at a large scale with multiple AWS accounts. Static IAM Keys also introduces the risk of secrets sprawling into other applications and may leak into logs in plain text when using a bad script and there always remain the endless toil of manually rotating and replacing the keys in your CI/CD tool of choice.
- When was the last time you have rotated and replaced the IAM keys used for resource deployments ?*

No more IAM secret key management !
The new OpenID Connect feature in Bitbucket streamlines the configuration of authenticating the Bitbucket Pipelines across your AWS landscape without having to generate Static IAM keys. The OpenID Connect is based on OAuth 2.0 and uses REST/JSON message flows.
Configuring Bitbucket Pipelines as an IdP on AWS using Cloudformation Template
Prerequisites
-
Obtain Bitbucket Identity URL - This is the issuer URL for authentication requests
-
Get the Thumbprint of the Root Certificate Authority
-
Audience - This is the recipient the token is intended for. See more detail about audience
-
Deploy the Cloudformation Template to Create the IAM OIDC IdP and assign it an IAM Role -
This Cloudformation Template generated Idp is IP restricted with the Bitbucket Public IPs so that the Web Identity Role can only be assumed when invoked via Bitbucket Pipeline for controlled execution.
Detailed Steps :
In order to register the OpenId IdP in AWS we first need to obtain the Thumbprint of the root CA - Log in to the Bitbucket and select the workspace for which you would like to setup the OpenID Connect authentication.
1 - Select a Bitbucket repository for which you would like to configure the OpenID Connect and click on Settings > OpenID Connect and obtain the Identity provider URL and the Audience and then follow the Steps 1-6 in this AWS knowledge Article,to get the Thumbprint optionally if you would like to obtain the thumbprint the CLI way append /.well-known/openid-configuration to the URL and then access this URL in the browser and make a note of jwks_uri or the following cURL command.
$curl --silent -X GET https://api.bitbucket.org/2.0/workspaces/REPLACE-WORKSPACE-NAME/pipelines-config/identity/oidc/.well-known/openid-configuration | jq .jwks_uri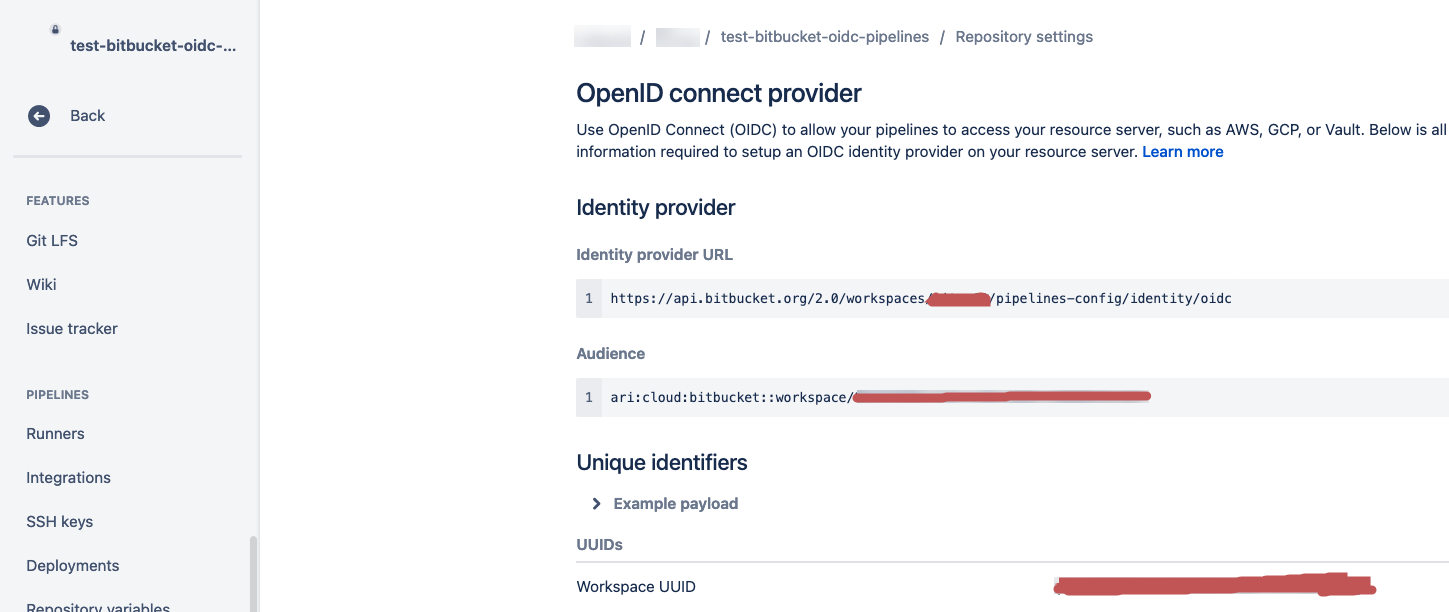
2 - Make a note of the top level domain - *for example *api.bitbucket.org
3 - Run the following command to generate the certificate ,starting from -----BEGIN CERTIFICATE----- until -----END CERTIFICATE-----of the second certificate in the output.
$openssl s_client -servername api.bitbucket.org -showcerts -connect api.bitbucket.org:4434 - Save the certificate text obtained from step -3 and save to to a text file called certificate.crt and run the following command to get the thumbprint
$openssl x509 -in certificate.crt -fingerprint -noout | sed 's/SHA1 Fingerprint=//' | tr -d :5 - Now the next step is to deploy the Example Cloudformation Template in your AWS Account or you can also deploy the Template as Cloudformation Stackset targeting multiple AWS Accounts Organisational Units as mentioned in my previous blog post.
Note: The Cloudformation Template in this blog assigns the IAM role with default AdministratorAccess Policy - You may want to attach a more restrictive IAM policy for your usage.
The following Parameters are required to deploy the Cloudformation Template:
- WorkspaceName - Your Bitbucket Workspace Name
- RoleName - IAM Role Name for WebIdentity to Assume Credentials
- Audience - Obtained from the Bitbucket Repository OpenID Connect Settings
- Thumbprint - Obtained from the Step-3 Above.
- URL - The Provider Identity URL obtained from he Bitbucket Repository OpenID Connect Settings.
CloudFormation Template - Click to expand!
1
2
3
4
5
6
7
8
9
10
11
12
13
14
15
16
17
18
19
20
21
22
23
24
25
26
27
28
29
30
31
32
33
34
35
36
37
38
39
40
41
42
43
44
45
46
47
48
49
50
51
52
53
54
55
56
57
58
59
60
61
62
63
64
65
66
67
68
69
70
71
72
73
74
75
76
77
78
79
80
81
82
83
84
85
86
87
88
89
90
91
92
93
94
95
96
97
98
99
100
101
---
AWSTemplateFormatVersion: '2010-09-09'
Description: >-
  [Do Not Delete]
  Template to create Bitbucket Cloud OIDC Provider Identity in AWS Account

Parameters:
  WorkspaceName:
    Type: String
    Description: Bitbucket Cloud Workspace name
  RoleName:
    Type: String
    Description: IAM Role Name to be assumed by the Web Identity
  Audience:
    Type: String
    Description: >-
      The audience is the Client ID issued by the identity provider.
  Thumbprint:
    Type: String
    Description: >-
      Thumbprint is used to verify that the Provider URL is accurate.
  URL:
    Type: String
    Description: >-
      Provider URL that is displayed as Identity Provider on OpenID Connect
      in Bitbucket Cloud.

Resources:

  OIDCProvider:
    Type: AWS::IAM::OIDCProvider
    Properties:
      ClientIdList:
        - !Ref Audience
      ThumbprintList:
        - !Ref Thumbprint
      Url: !Ref URL

  OIDCProviderIAMRole:
    Type: AWS::IAM::Role
    Properties:
      RoleName: !Ref RoleName
      AssumeRolePolicyDocument:
        Fn::Sub:
          - |
            {
              "Version": "2012-10-17",
              "Statement": [
                {
                  "Effect": "Allow",
                  "Principal": {
                    "Federated": "arn:aws:iam::${AWS::AccountId}:oidc-provider/api.bitbucket.org/2.0/workspaces/${workspace_name}/pipelines-config/identity/oidc"
                  },
                  "Action": "sts:AssumeRoleWithWebIdentity",
                  "Condition": {
                    "StringEquals": {
                      "api.bitbucket.org/2.0/workspaces/${workspace_name}/pipelines-config/identity/oidc:aud": "${audience}"
                    },
                    "IpAddress":{
                      "aws:SourceIp": [
                        "34.199.54.113/32",
                        "34.232.25.90/32",
                        "34.232.119.183/32",
                        "34.236.25.177/32",
                        "35.171.175.212/32",
                        "52.54.90.98/32",
                        "52.202.195.162/32",
                        "52.203.14.55/32",
                        "52.204.96.37/32",
                        "34.218.156.209/32",
                        "34.218.168.212/32",
                        "52.41.219.63/32",
                        "35.155.178.254/32",
                        "35.160.177.10/32",
                        "34.216.18.129/32"
                  ]

                }
                  }
                }
              ]
            }
          -
           audience: !Ref Audience
           workspace_name: !Ref WorkspaceName
      Path: /
      ManagedPolicyArns:
        - arn:aws:iam::aws:policy/AdministratorAccess
      Tags:
        - Key: "Name"
          Value: !Ref RoleName
        - Key: "Managed By"
          Value: Cloudformation Stack

Outputs:
  IAMRoleARN:
    Description: Web Identity Assume Role Arn
    Value: !GetAtt OIDCProviderIAMRole.Arn
  OIDCProviderArn:
    Description: Bitbucket Cloud OIDC Provider Identity Arn
    Value: !GetAtt OIDCProvider.Arn
Demo
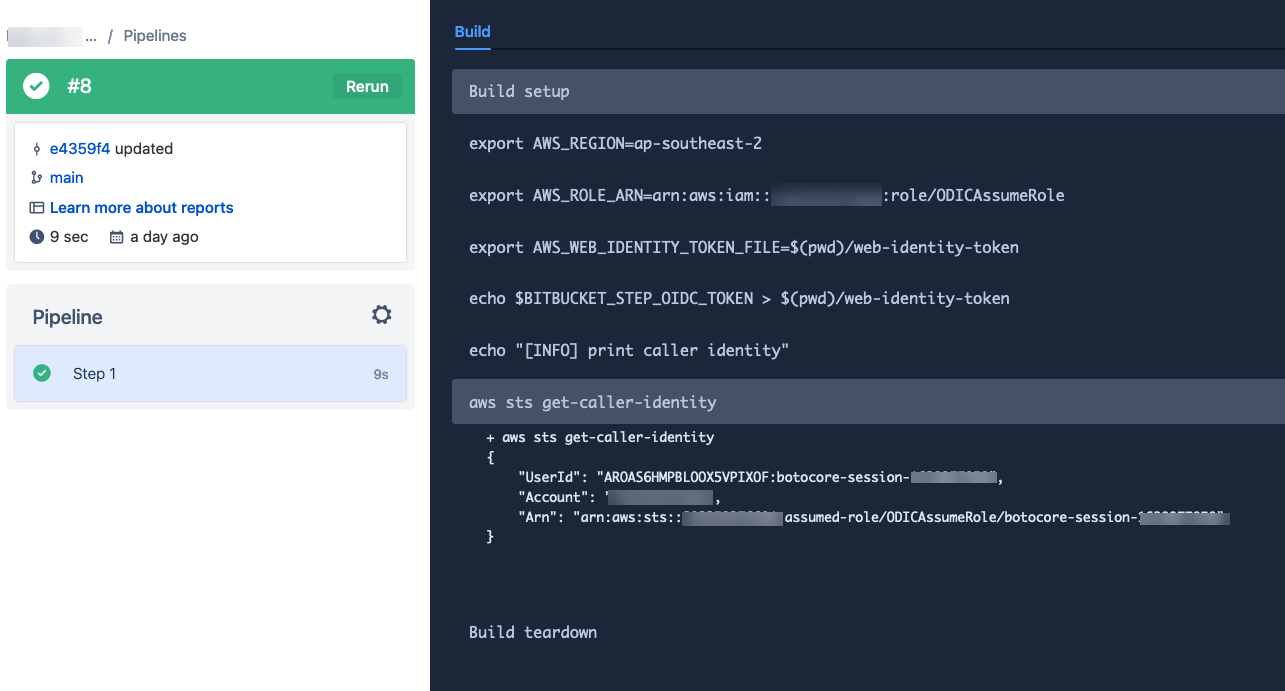
I have configured my demo AWS account with the above mentioned Cloudformation Template to create the Bitbucket IAM idP and pushed the following pipeline yaml file to to the Bitbucket Repository and the pipeline can assume the Web Identity IAM Role to print the AWS account information.
Make sure to set oidc: true in the bitbucket-pipelines.yml
1
2
3
4
5
6
7
8
9
10
11
12
13
14
15
16
//bitbucket-pipelines.yml
---
image: amazon/aws-cli

pipelines:
  default:
    - step:
        oidc: true
        script:
          - export AWS_REGION=ap-southeast-2
          - export AWS_ROLE_ARN=arn:aws:iam::222229272234:role/ODICAssumeRole
          - export AWS_WEB_IDENTITY_TOKEN_FILE=$(pwd)/web-identity-token
          - echo $BITBUCKET_STEP_OIDC_TOKEN > $(pwd)/web-identity-token
          - echo "[INFO] print caller identity"
          - aws sts get-caller-identity
The Bitbucket Pipeline ran and was able to assume the Web identity IAM role and print the AWS account information using the AWS CLI command.